
By Jim Cavanagh
A member wrote in and sent pictures to our forum, showing a cancerous growth on his prop blade and what appeared to be a crack emanating through the blade for a couple of inches. By the time the discussion was over, it was a learning moment: When it comes to several areas of our planes, we shouldn’t try to fix them ourselves, and the propeller is often one of those areas.
Naturally, there was a flood of opinion, and Joe Mayer, Chief Inspector for Aircraft Propeller Service (www.aircraftpropeller.com, APS) provided the light that was needed in the fog.
The picture showed a bubbling, scabby-looking blotch on the prop blade. The owner took pics and there is a definite suggestion of a crack emanating from the bubbly area. Corrosion was obviously the culprit and could only happen if water had been introduced beneath the paint on an untreated or improperly painted surface. Perhaps there was a fingerprint under the primer. We’ll never know. Somehow moisture got in direct contact with the aluminum for a period of time.
Stripped and polished
The local A&P was called in and – after stripping, cleaning, and a dye penetrant test – found that the damage was confined to the corrosion, and the crack was just in the paint. I have seen this before when a non-prop paint was used.
The lessons learned here could save some lives. I have been writing about propellers for nearly 40 years and have picked up some valuable tidbits from prop manufacturers, repair stations, and engineers who design them. I have also been in the EAA since the ’70s and totally understand the builder mindset, so all pilots should take this as constructive and really think about it.
A stripped and polished propeller, no matter how good it looks, is doomed to corrosion, erosion, and (if ignored) will have a limited life. Props have to be protected from moisture and, to a degree, from other objects. Bug shells can be brutal on a prop! Sensenich uses 2025-T6 aluminum for props because it is very durable, lightweight and strong – many constant speed props, hubs, and blades are 7075. Pure aluminum would be much more resistant to corrosion but would lack the characteristics that would allow it to retain its shape both static and in use – and to last for literally decades.
If you have a preference for unpainted props, you need to understand that function is more important than form in this case. Cessna Owner Organization forum moderator Scott Sherer learned this when he bought his new-to-him used plane a year ago. It came with an unpainted propeller, but it didn’t stay that way for long, thanks to our organization’s A&P.
“Among my eight airplanes, I’ve never had one with an unpainted prop, until I traded my Piper Seneca for my Arrow last March,” Sherer said. “The Arrow came with an unpainted prop (see Before photo above). I didn’t find it attractive, but it never occurred to me that it could be dangerous, too, in its unpainted state.
“Shortly after I purchased it our association A&P, Erich Rempert, pushed me into painting it as soon as possible. It never occurred to me to ask him why he was pushing to have it painted. I thought that it was for the same reason that I thought it should be painted; it looked bad. But the reason was primarily related to safety.”
Problems with the paint
That said, we need to look at the second problem with the prop at the start of the article. The paint shows that this is not propeller paint. It is a gloss finish and props are matte. Prop warning stripes need to be contrasting colors to be visible. Even so, getting to within a few feet of a turning prop should be avoided. There is no reason to be there unless you are hand propping an airplane, a job for the VERY experienced airman
So, to start with the legal stuff, a propeller has to be on the TC of the aircraft. It has to be legal, meeting all of the specs to which it was manufactured, then certified by either a shop, an A&P Inspection, or the manufacturer. An older prop has to have been overhauled at a TBO of 2,000 hours, a Sensenich for example. It also has to be maintained as per the manufacturer’s instructions. All later and overhauled props have prop logs, per part 43, section 91.417, and need to be time-tracked.
The list of FAA Approved Maintenance Items, of which there are 35, does NOT include any work done on your propeller, other than redoing the safety wire on the bolts. An owner can check the track of his prop. The tenth item on this list is:
- Refinishing decorative coating of fuselage, balloon baskets, wings, tail group surfaces — excluding balanced control surfaces — fairings, cowlings, landing gear, cabin, or cockpit interior when removal or disassembly of any primary structure or operating system is not required.
So, while many owners do touchup and filing, it is not precisely legal and should be done by or under the supervision of an A&P/IA.
There is a reason there are propeller repairmen. They are not airframe or power plant mechanics. There is a reason and the FAA and military know this.
Joe Mayer – Read the Opinion Piece in our magazine
Adjustable props
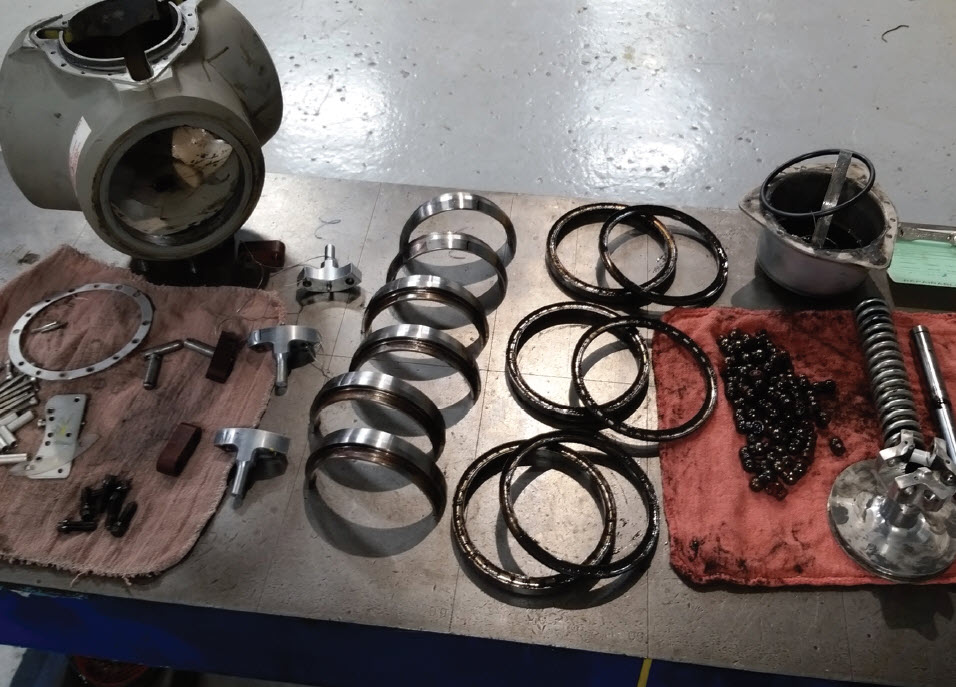
This article talks a lot about fixed-pitch props, but adjustable props have the same blade problems, and even more, in the hub areas. You will see in these adjustable-prop images that the “big” military/airliner-type props are just as susceptible to corrosion as ours. See the pictures at the end of this article showing all of the parts in an adjustable prop (pictures provided by Aircraft Propeller Service).
Here is where the equipment on experimentals escapes this umbrella. The aircraft builder, or whomever holds the Repairman’s Certificate for that aircraft, can do the maintenance required on the entire aircraft, and an A&P – not an IA – can sign off the Condition Inspection. For a certified aircraft we call this an annual.
It is thought that if you build an airplane that you can tweak it and change things, but as I have come to know whenever anything is changed on the airframe, the aircraft is subject to being recertified, mainly because the components and possibly the aerodynamics of the aircraft have been reconfigured and it must undergo an inspection and a flight demonstration.
Don’t try this at home
I love the EAA, homebuilts, and the spirit of homebuilders, but there is a real world that includes rules and regs, and these reflect very conservative safety concerns. Even if you assume that a prop was stripped, dressed well, cleaned, primed, and painted with care, it takes a lot of knowledge to do this and not every guy has the patience or the craftsmanship. The problem is two-fold: legality, and using the correct materials.
Propellers need to be protected from moisture and simple priming is helpful but not the real answer. Once dressed and cleaned, a prop needs to be treated with Alodine or anodized. These are chemicals that etch into the surface, creating a substrate. It leaves a bonded chemical corrosion-preventive film on the metal and the surface actually changes to one that is sealed from moisture and other elements.
In the old days, we used to have to clean, etch, and then use Alodine aluminum when we painted. Then came zinc chromate and, finally, finish paint. These days it is easier. Different paint companies have different products.
The right way
The prop on this airplane was stripped of paint at the damage and sandpaper was used to remove all of the corrosion. Sometimes a grinder needs to be used, depending on the depth. Sensenich’s Terry Griffe reminds us that the depth of the grinding is critical. The grinding depth is directly related to the overall condition and balance of the rest of the prop. Some direction is given in Part 43.
Over the years, continued dressing, cleaning up edges, sanding, filing or grinding out damage, and the continual erosion of material from dirt and sand will leave a prop blade markedly different from its new condition.
It would be nice to be able to show you the different stages the repair went through. In a nutshell, the owner of this prop told us that the damage was removed and the area blended, and was then cleaned with a cleaner – like Prep Sol – to eliminate oils and waxes. Not knowing the exact procedure, the damaged area was treated with Alodine and touched up. Touchup painting can become a nightmare if you don’t know the materials to use.
McCauley, Sensenich and Hartzell use Sherwin Williams Propeller paint – a two-part polyurethane paint that is extremely durable! Aircraft Spruce sells Tempo epoxy paints in gray and black for propeller use. If you are going to paint the prop, be sure the paint you use on the back side is a flat finish.
If paint is taken off, that should be done evenly and to all blades, then re-applied to all blades (again, evenly). Take a mental note of what is taken off and re-applied or write it down if others may be working on it. If in doubt, leave it to a mechanic in the know or a prop shop. Use the correct paint with the correct corrosion preventative in the form of a chemical film – Alodine or Anodize.
Why you should use a mechanic
Prop manufacturers prefer that any of this work be done by a prop shop simply because of the chemicals and the equipment needed to do a good job. If done incorrectly, it can lead to corrosion or a scrap (un-airworthy) propeller. An HVLP gun is needed, with a couple of different tips; an air/oil separator used in-line to keep from blowing water or moist air in with the paint; a high-quality respirator must be used and the conditions, cleanliness, temperature and protection for other surfaces needs to be in place.
And THEN, you should balance the prop. The shop has the equipment to do this, and when installed, a dynamic balance will address anything in the rotating assembly, the engine, even the mags. This is for the good of everything that can possibly vibrate from rivets to radios. You cannot remove a quarter-sized area of metal from one side of a blade without affecting the balance. The shops know how to do this and have the balancing rig needed to do the job right. I know props look easy, but they are much more critical than they seem.
Normal procedure on a prop is to rub the leading and trailing edges with your hand to find dings or pits. A pit can cause a stress riser that could initiate a crack and you could lose part of a blade. The shaking that follows this can and has torn engines completely off of the aircraft. Try gliding in with 300 lbs. missing off the front end! This is why aerobatic guys and some racers use chains or cables to secure the engine to the fuselage should the engine mount or bolts break. It is wise to use an oiled rag to wipe the prop after you check the dipstick or wipe down the cowling. This leaves a film that keeps bug juice from sticking and repels precipitation.
Check the tips very closely. This is where debris is picked up and the tips suffer a lot of erosion; this is like being sanded down with 80 grit! Some props, like the Sensenich 76EM series, are 76-inches long and “no diameter reduction” allowed! Vibration will fatigue the metal, and at some point, it will develop a crack and ultimately separate. A prop is literally like a giant spinning tuning fork.
We have to respect our propellers. They are remarkable inventions, being so small yet capable of pulling a ton of airplane through the air at high speed with 10-20 tons of centrifugal loading. But they operate at great speeds and both create and respond to resonances from the engine and the airframe. Molt Taylor, the great aviation inventor, once told me that you can hold a piece of wood at arm’s length and shake it forever, and it would not crack. But take an aluminum bar and do the same thing and at some point, it will break. Look up FAA propeller tests online sometime. You will not believe that a prop can vibrate and bend that much!
Jim Cavanagh has been writing for the Cessna Owner Organization for more than 25 years and wrote his first Cessna article in 1973. He has flown nearly 250 different airplanes for articles on performance, mods, techniques, and pilot reports. Jim is a devout 3,000-hour VFR sport pilot who finds as much enjoyment in working on and repairing planes as he does flying them.

